


Mackenzie, 7 days old.

Hi guys! Last week I posted about my daughter Mackenzie’s nursery that I put together while in graduate school living in Albuquerque. Anyway, since my husband was in graduate school as well, our dual TA income wasn’t exactly going to allow for my dream Land of Nod nursery. But I definitely used a lot of their designs as inspiration. I was a little bit obsessed with how this nursery was going to come together, and I wanted it to be everything that I didn’t like about my son’s nursery. He outgrew his so quickly, and I wanted to put together a color palette/decor that would be more timeless and not so babyish. We actually painted the room grey before I was even pregnant, since this would be a great neutral background color. I was also obsessed with the teal/turquoise color that was starting to pop up everywhere, so I knew I was going to include that color as well. Lastly, I wanted a more gender-defining color to add to the palette, I was going to do orange if it was a boy, and pink if it was a girl. Let me tell you, after having a two year old boy, when we found out we would be having a girl next, I went and hopped on the pink train immediately:
 Left to Right: Changing pad cover, fabric for pillow, fabric for cribskirt, pom poms for sheer closet curtains (I literally just hot glued these to $10 sheers from Target, easiest thing ever!).
I didn’t have a blog at the time, so I don’t have step by step photos of all the things I DIY’ed, but here is a list of projects I did as well as links to the tutorials I used:
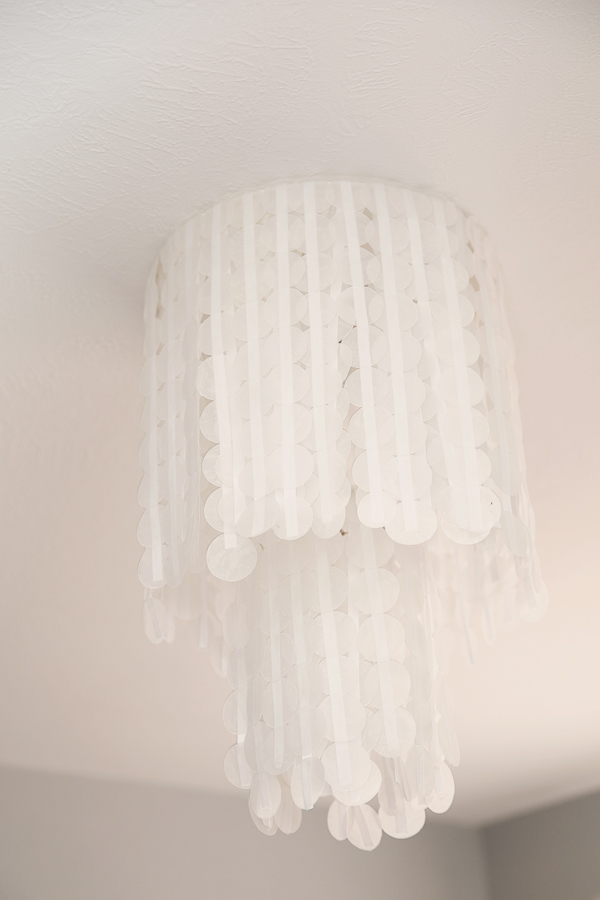
1. Faux Capiz-Shell Chandelier (made from circles of wax paper). This took a REALLY long time, probably a few weeks in front of the TV spent ironing together sheets of wax paper and then cutting them with a circle. I also didn’t have a sewing machine at the time, so instead of sewing the circles together with thread, I hot-glued them all them all to white ribbon. This part wasn’t that difficult, but I had to buy a substantial amount of white ribbon, which definitely increased the cost of this. I still think it was worth it, I loved the way it turned out and got lots of compliments on it. This is the tutorial I used: http://www.designsponge.com/2010/08/diy-project-brennas-paper-capiz-shell-chandelier.html
2. Upcycled Dresser. I found an amazing dresser after scouring Craigslist for a few weeks, and it was only $10! It was definitely in need of some serious TLC, but I just loved the lines and drawer pulls that came with it. I think we spent an extra $10 to have it delivered to our house (the sellers were very accommodating), and with a lot of sanding, some shaving off of the drawers to get them to work again (my wonderful husband did that part), filling in the chipped veneer with wood putty, more sanding, and finally painting, we were in business. I don’t know which tutorial I used at the time, but if I were to do this again now, I would totally skip the sanding step, which is quite labor intensive, and instead just purchase a high covering primer like this: http://www.rustoleum.com/product-catalog/consumer-brands/zinsser/primer-sealers/high-hide-cover-stain-primer
I purchased the primer at Lowes. I wish I remember what color paint I used, but sadly I don’t have the can of paint anymore.


3. Upholstered, upcycled Ottoman. This was a pretty straightforward tutorial. That being said, I’m not sure it would have turned out as well had I not enlisted the help of one of my handy crafting friends. Oh, and at the time when I was making this, I wasn’t pregnant with my daughter yet (so there might have been some gin and tonics involved, :-). It was originally intended for my living room–(reality check, don’t ever buy grey and white striped fabric for a heavy-use piece of furniture in a common room with a two year old around, it will not end well). Luckily, this ended up being perfect for my grey, pink and teal nursery scheme. Tutorial here: http://www.sixsistersstuff.com/2012/07/diy-tufted-ottoman-fabric-recover.html
4. No Sew Crib Skirt. Easy and straight-forward, involves your choice of fabric, hemming tape, and some Velcro. I used this tutorial here:
http://www.younghouselove.com/2010/03/nursery-progress-skirting-the-issue/

5. Belly Casting. Probably my favorite project of them all! This is definitely a two-person project (or three if you count the baby, hehe). I think I was 36 weeks pregnant when we did the casting, I didn’t really follow a tutorial or anything, I just bought a kit at Babies R US. Here’s a tip though, and I learned this the hard way–the water will eventually get cold, so unless you want your nipples to be featured rather prominently, wear a bra! Before hand I scoured Pinterest to decide what style of casting I wanted to do, and decided on the one-shoulder look and to only cast down to my belly, and not include my legs. Then I grabbed some pink ribbon and flowers from Michaels and was super happy with how it turned out:

6. Paper flower pom-poms. I know you buy these all over Etsy, but seriously, they are so easy to make, ridiculously cheap, and add a lot of pop to a room. I paired the teal and pink pom poms with an awesome paper star lantern that I purchased at a local paper store in Albuquerque. Good ol’ Martha breaks it down nice and and easy here: http://www.marthastewart.com/265163/pom-poms-and-luminarias-how-to

7. Calendar/card art. No tutorial necessary here, just think outside the box when looking for artwork. Art doesn’t have to be expensive, or come framed or matted already. I think three of the pieces out of the whole wall were actually pre-framed/matted artwork, the rest were cards I got at paper shops, old black and white family photos that I put on top of colored paper, and of course the awesome Charles Haper animal prints from a calendar I had. Lets be honest, this was a current calendar but it never even made it up onto the wall, I immediately tore out the pictures to frame for the nursery. Oh and those circles of fun colored fabric? Another super easy art idea: take scraps of fabric that you like and put them in different size embroidery circle hoops, and hang them in a cluster.


I think those are all the major DIY projects in the nursery. Things I splurged on were the rug (Overstock), crib sheets (Pottery Barn Kids), the changing pad covers (Etsy), the window curtains (Ikea), a few of the frames (Target), and the recliner. The crib was my son’s from when he was a baby. The teal bookshelf was a flea market find that my friend brought over, it was originally painted an ugly maroon and primed over, so my husband just gave it a few coats of the same teal as the dresser, and then it was nursery ready.
Whew! I think that’s it. Hope you all enjoy, I would love to here DIY/thrifty ideas that you all did for your kid’s nurseries or bedrooms. I’m currently working on decorating a joint room for my son and daughter, and it looks pretty good but it still has a ways to go.


